Working with multiple Git accounts in the same computer with SSH
by Rui Fernandes -
Introduction
Let's suppose that you have a Git account (Github, Gitlab, Bitbucket, etc.) where you put personal projects and a work account, which you likely need if you work for a company. In that case, you'll need to switch between them, depending on the project you are working on. How to do that easily? I'll show you from scratch.
Configuration
First of all, we'll set up SSH because it is a secure way to connect to a Git platform, and it doesn't require a username and a password every time I push or pull.
Personal Account
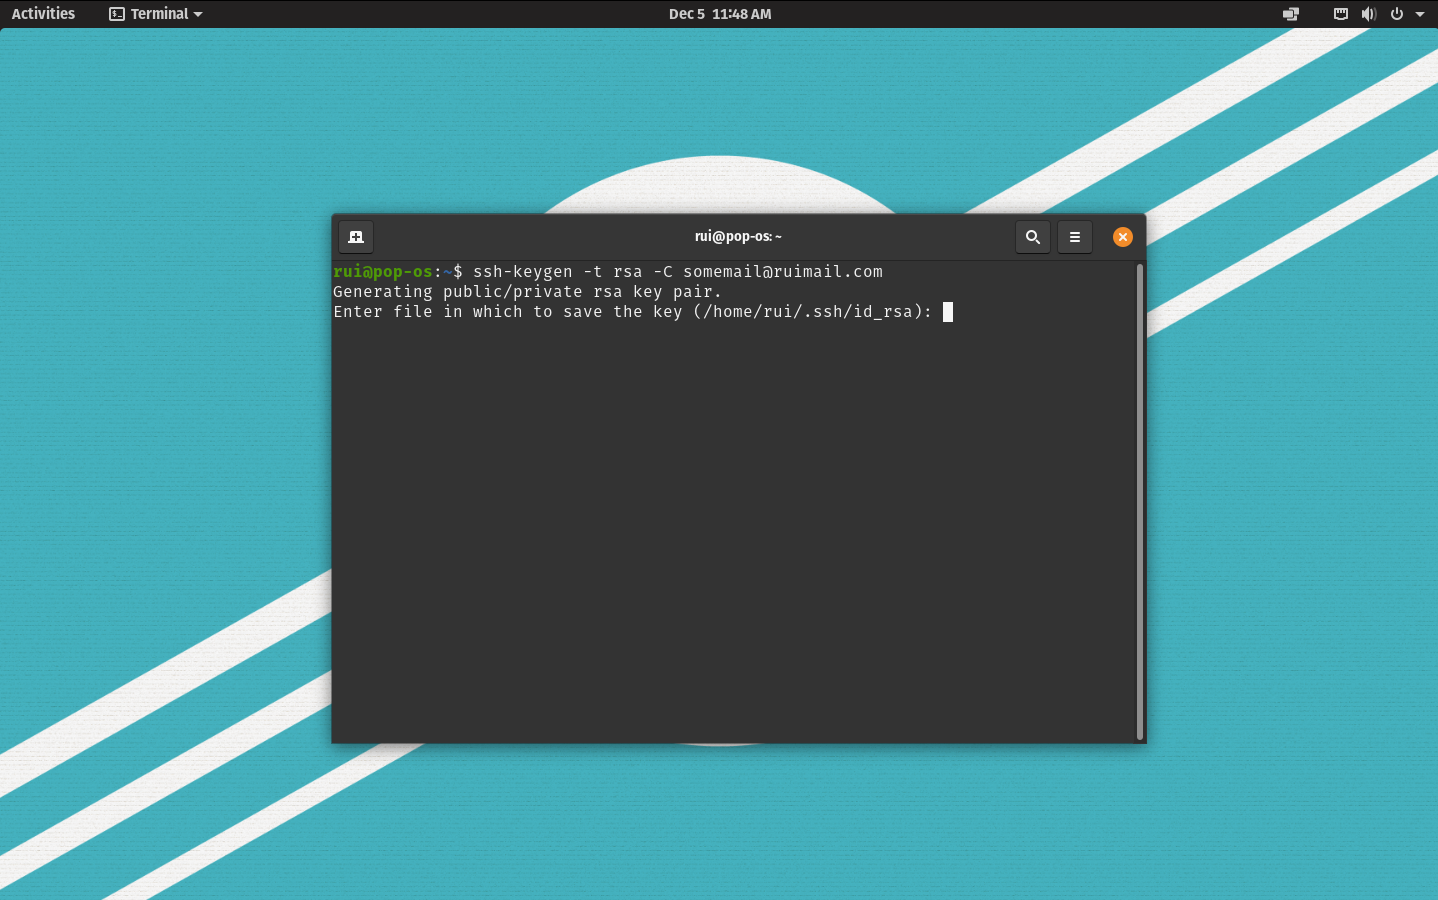
Open your terminal (Linux/macOS) or Git Bash (Windows).
Generate a SSH key:
- Linux/macOS
ssh-keygen -t rsa -C somemail@ruimail.com.br
- Windows
ssh-keygen
It will ask for a name to the file:
If you want to set a different name, remember to type the entire path to the file, like:
- /c/Users/username/.ssh/id_rsa (Windows);
- /home/username/.ssh/id_rsa (Linux).
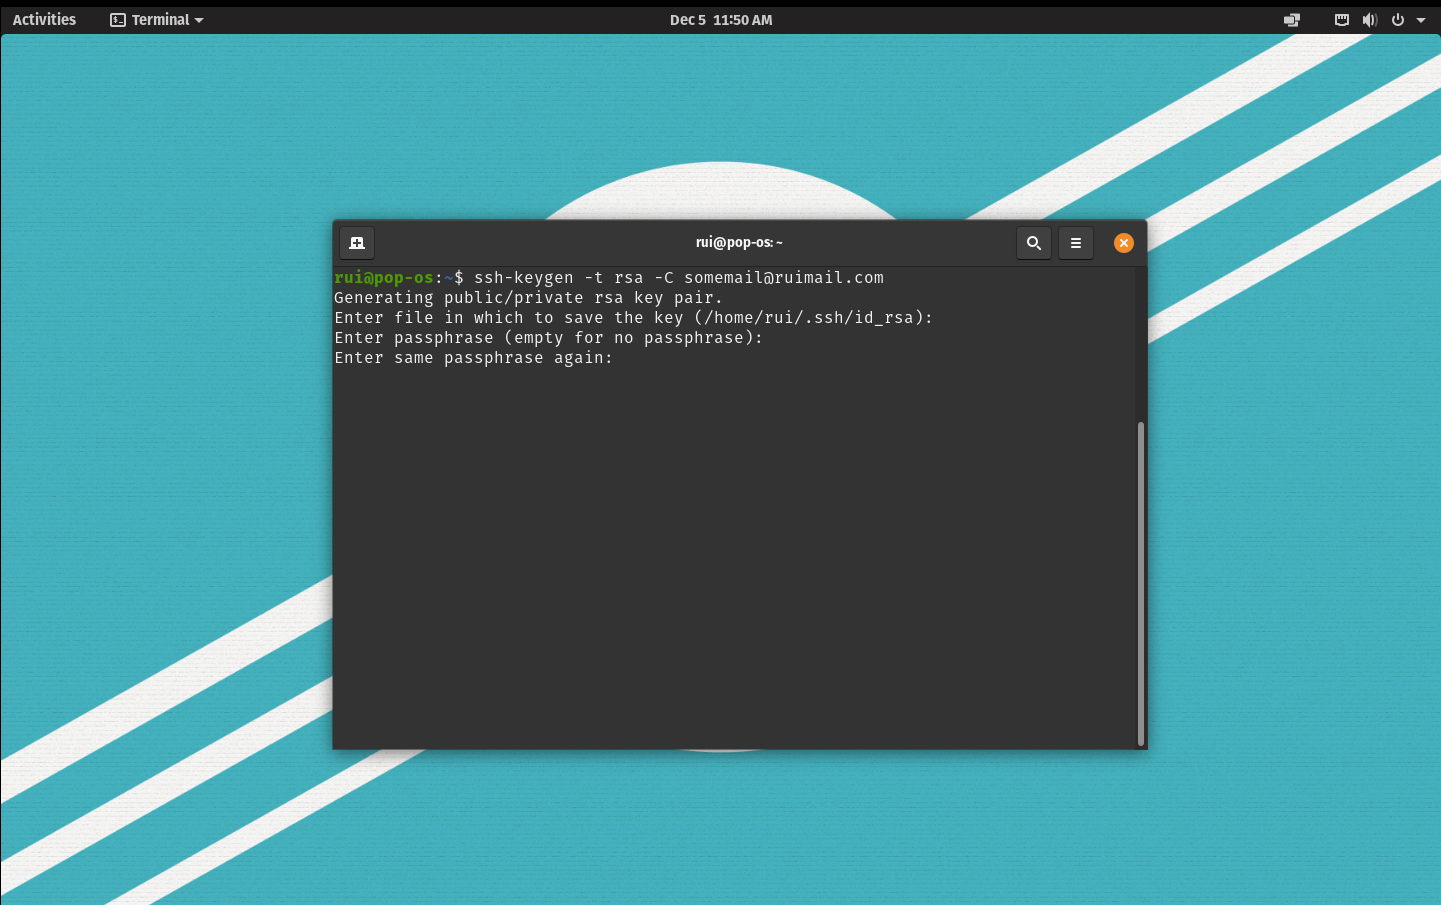
But if you want the default name, type enter.
You can also set a password, if you want. Else, let it empty.

Confirm password:
And then, check and copy your public key (in this example, I called id_rsa.pub):
cd ~/.ssh
cat id_rsa.pub
Now, go to your Git SSH configuration and add that public key (you must use it for one account in one git platform):
-
Github: https://github.com/settings/keys
- Click on the green button ("Add new ssh key"), and you'll be redirected to this page. Then, paste your ssh key and give a title to it:
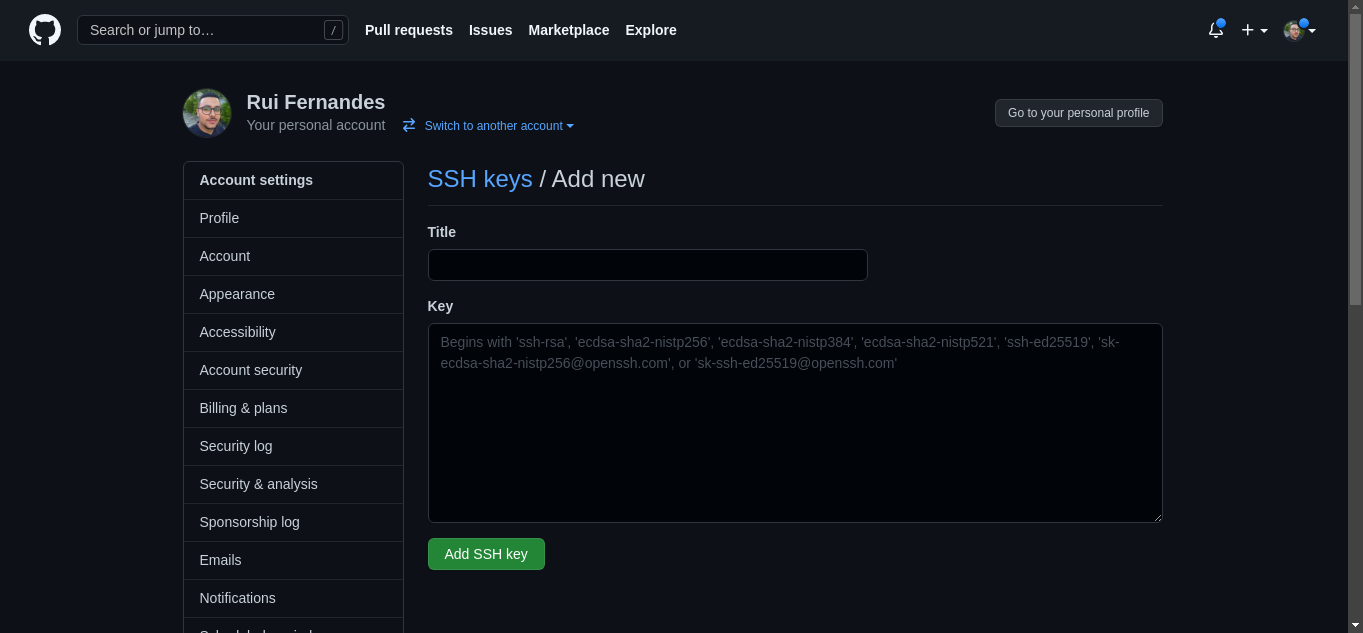
- Click on the green button ("Add new ssh key"), and you'll be redirected to this page. Then, paste your ssh key and give a title to it:
-
Gitlab: https://gitlab.com/-/profile/keys
- Paste your ssh key and give a title to it:
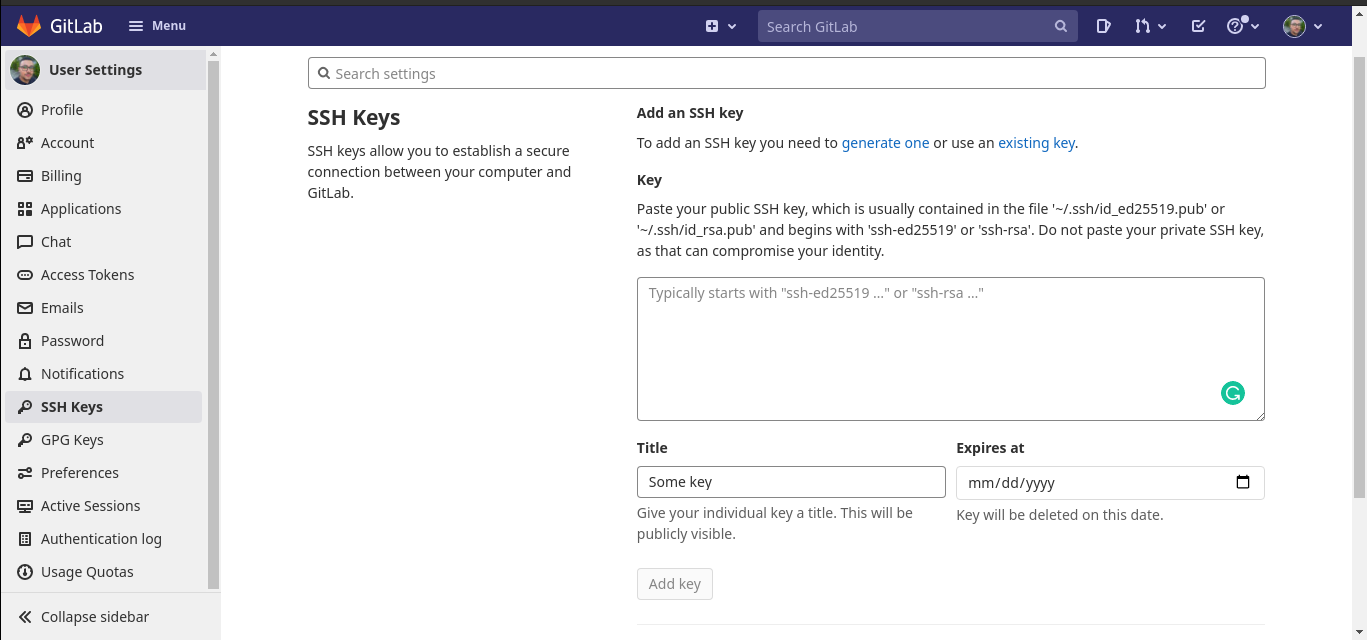
- Paste your ssh key and give a title to it:
-
Bitbucket: https://bitbucket.org/account/settings/ssh-keys
- Click on the blue button ("Add key"), and it will open this modal. Then, paste your ssh key and give a title to it:
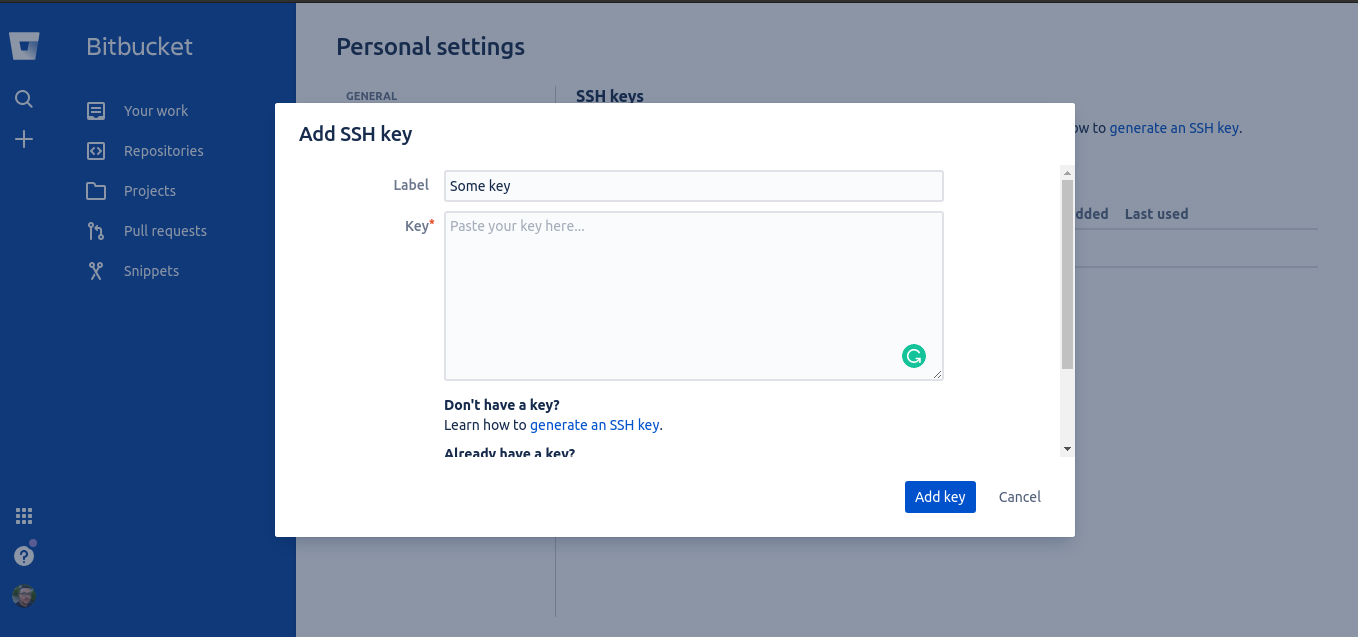
- Click on the blue button ("Add key"), and it will open this modal. Then, paste your ssh key and give a title to it:
Work Account
Generate a SSH key:
- Linux/macOS
ssh-keygen -t rsa -C someworkmail@company.com.br
- Windows (Git Bash)
ssh-keygen
You can repeat the same process, but you must set a different name for that key, like work_rsa. Remember to type the entire path to the file, like:
- /c/Users/username/.ssh/work_rsa (Windows);
- /home/username/.ssh/work_rsa (Linux).
And then, check it out and copy it (in this example, I called work_rsa.pub):
cd ~/.ssh
cat work_rsa.pub
Log in on another account of your Git platform and repeat the same process of the personal account:
-
Github: https://github.com/settings/keys
- Click on the green button ("Add new ssh key"), and you'll be redirected to this page. Then, paste your ssh key and give a title to it:
- Click on the green button ("Add new ssh key"), and you'll be redirected to this page. Then, paste your ssh key and give a title to it:
-
Gitlab: https://gitlab.com/-/profile/keys
- Paste your ssh key and give a title to it:
- Paste your ssh key and give a title to it:
-
Bitbucket: https://bitbucket.org/account/settings/ssh-keys
- Click on the blue button ("Add key"), and it will open this modal. Then, paste your ssh key and give a title to it:
- Click on the blue button ("Add key"), and it will open this modal. Then, paste your ssh key and give a title to it:
Using both accounts locally
Create a config file
Linux/macOS
To use both accounts, you must create a config file for ssh. For that, use your favorite text editor (like vim, nano, gedit, etc.):
cd ~/.ssh

## Using VIM
vim config

## Using Nano
nano config
Windows
On Windows, you'll need to open Git Bash and create a config file, running this command:
cd ~/.ssh

notepad config
Configuring hosts
Now, you'll need to configure the hosts:
## Personal Account (Github)
Host github.com
 HostName github.com
 IdentityFile ~/.ssh/id_rsa

## Work Account (Github)
Host github.com-work
 HostName github.com
 IdentityFile ~/.ssh/work_rsa
Notice that the word "work" (on the second host, after github.com-) could be any word provided it's different from the other hosts. In that case, for repositories of your work account, you'll clone from git@github.com-work. For your personal account, git@github.com.
Save and close.
Now, you can test it by cloning a private repository with SSH. On Windows, open Git CMD. On Linux/macOS, open your terminal.
## Personal Account
git clone git@github.com:account1/privaterepo.git

## Work Account
git clone git@github.com-work:account2/privaterepo.git
Bonus: switching the account associated to the commits quickly
So, we configured the authentication part. But you still can't easily switch the account associated with the commit messages. We'll do that now!
Before that, ensure you have a git config file:
cat ~/.gitconfig
If you don't have it, run a global config command to set up a username and an e-mail to your commit messages.
git config --global user.name "yourusername"
git config --global user.email "someemail@ruimail.com.br"
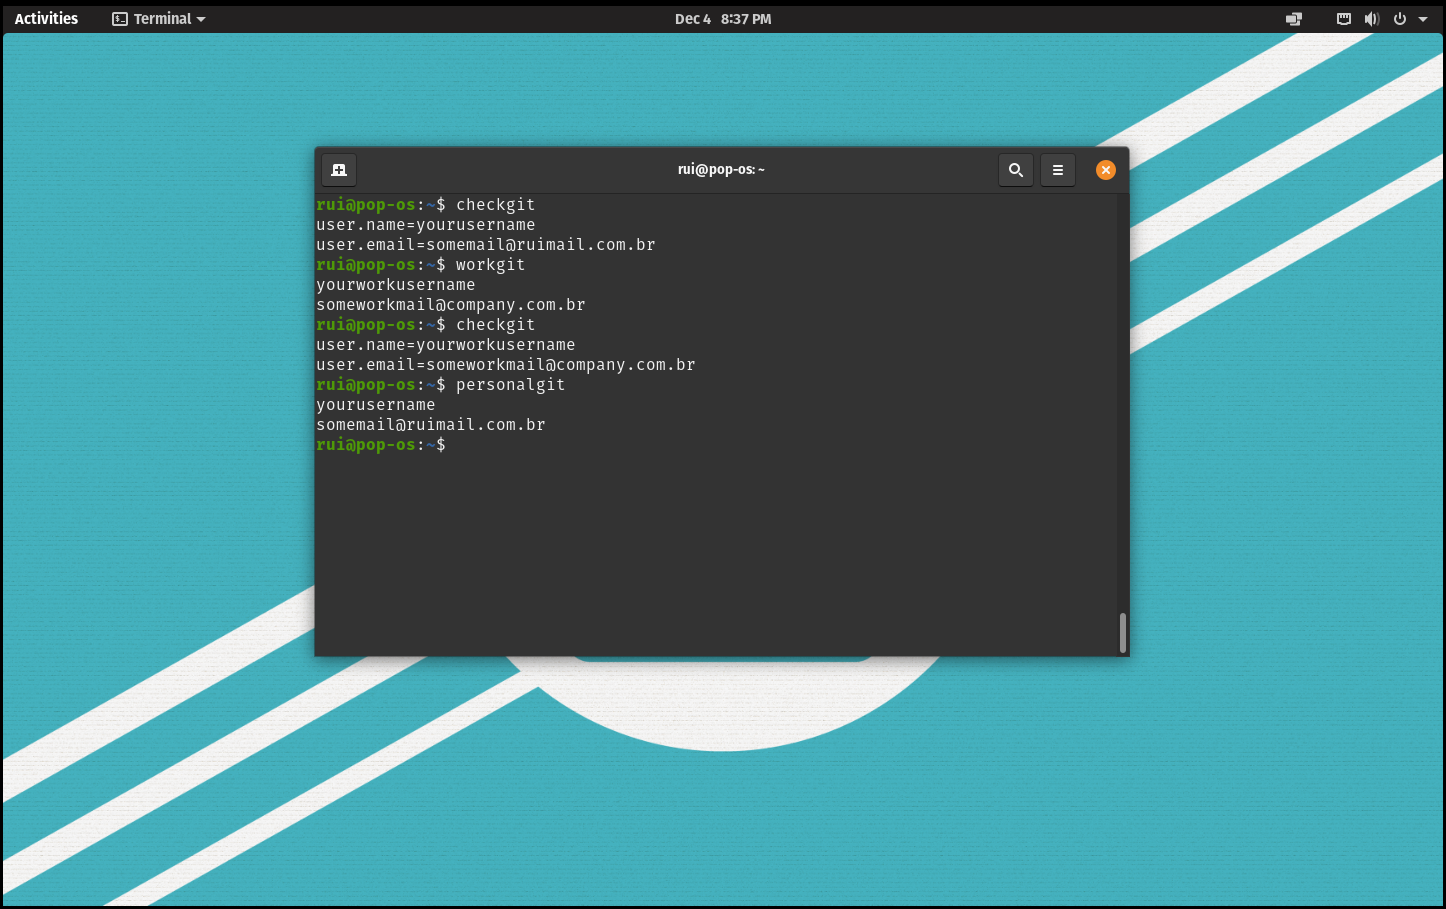
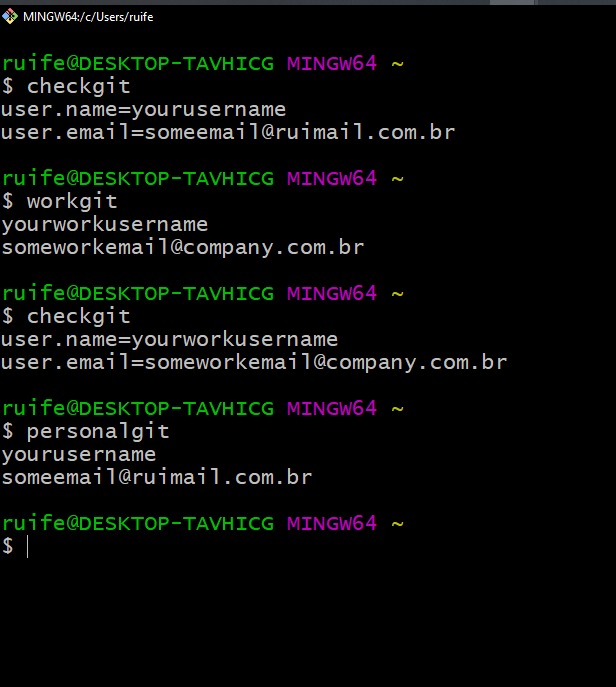
Manually, it's a bit tedious because you need to type that commands every time you want to change. But you can also create scripts for that. For instance, I use three scripts: personalgit, workgit, and checkgit (without extension).
- personalgit: Changes to the personal account
#!/bin/bash

USER_NAME="yourusername"
USER_EMAIL="someemail@ruimail.com.br"

git config --global user.name $USER_NAME
git config --global user.email $USER_EMAIL

echo $USER_NAME
echo $USER_EMAIL
- workgit: Changes to the work account
#!/bin/bash

USER_NAME="yourworkusername"
USER_EMAIL="someworkemail@company.com.br"

git config --global user.name $USER_NAME
git config --global user.email $USER_EMAIL

echo $USER_NAME
echo $USER_EMAIL
- checkgit: Checks the enabled account
#!/bin/bash

git config --global --list
On Linux/macOS:
## Give permission to execute
sudo chmod +x ./personalgit
sudo chmod +x ./workgit
sudo chmod +x ./checkgit

## Move to the binaries folder
sudo mv personalgit /bin
sudo mv workgit /bin
sudo mv checkgit /bin
Now you can use these commands on your terminal:
On Windows (with Git Bash):
Note: "username" is a placeholder here.
cd /c/Users/username
mkdir .mygitbinaries

mv personalgit .mygitbinaries
mv workgit .mygitbinaries
mv checkgit .mygitbinaries
To run those scripts on any folder, you need to add them to the PATH variable. Open ~/.bashrc:
notepad ~/.bashrc
Now, export PATH (you can write this at the end of the file):
export PATH=/c/Users/username/.gitbinaires:$PATH
In my case:

Restart your Git Bash, and you'll be able to use these commands:
Conclusion
Congrats! Now, you are able to use multiple Git accounts on your machine in an automated and easy way.
Do you have any questions?
Thanks for reading!
Attributions
Git Logo by Jason Long is licensed under the Creative Commons Attribution 3.0 Unported License.

Rui Fernandes
Focused Full Stack Engineer creating impactful digital solutions.